
Hello friends, in today’s post we are bringing (HTML and CSS Div diagram) you the complete series of html that how we can make use of div, so let’s start.
Diagram in html and css ?
We will make this diagram only with the help of html and css, how it is being made
To make this diagram, you should have knowledge about div, what is and how it works.
Because through this div, id and class, you can make the biggest website or design.
So we have started you from the basic
In html, div is an element of html, through which we can make any big block through its height and width through css.
You are being told step by step as well as will be explained to you by example.
Below you are being given the program of the first step
<!DOCTYPE html>
<html lang="en">
<head>
    <meta charset="UTF-8">
    <meta name="viewport" content="width=device-width, initial-scale=1.0">
    <title>fullstackgyan</title>
    <style>
       #outer{
        width: 400px;
        height: 400px;
        background: blue;
    }
    </style>
</head>
<body>
    <h1>This is the first level div in html</h1>
    <div id="outer">
    </div>
</body>
</html>
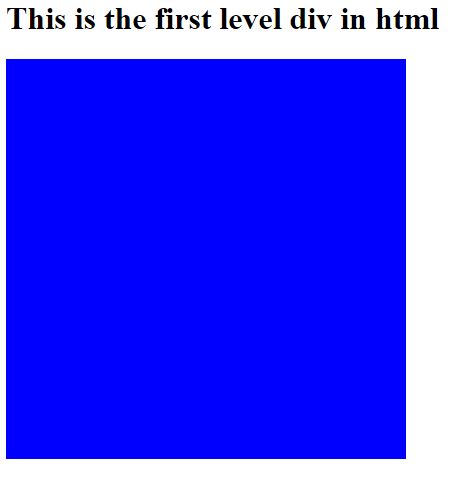
In this code you can see that this code is of html, which you can understand by looking at the extension of this file.
In this code h1 html tag or element is used to give heading, below that you can see div html element that an id is written in this div (id is always unique) i.e. the value of id is one page. The name is being given only once, whereas you can use the name of the class multiple times.
The id is taken in the div html element, whose value is named outer, even after defining outer, you cannot see the box on the browser unless the height and width have been defined in it.
please see more topics
- https://fullstackgyan.com/what-is-javascript-where-to-this-is-3nd-post/
- https://fullstackgyan.com/what-is-javascript-syntax/
- https://fullstackgyan.com/basic-infomation-of-javascript/
You can see in the above style tag that height and width have been defined in it.
Note: – If id is there then its id name is given using # in css and whatever css property you want to define, you can apply, the same class will be used for that in css (.) is used and inside that { } you can refer to the property of css
for example
<style>
     #outer{
	width: 400px;
	height: 400px;
	background: blue;
}
</style>
In this you background color has also been defined because you can see how big box has been created.
After this we will break this box into two parts according to the height i.e. half of the value we have defined in the height will be stored in an id and half of its height in an id.
You can understand this from the example given below.
<!DOCTYPE html>
<html lang="en">
<head>
    <meta charset="UTF-8">
    <meta name="viewport" content="width=device-width, initial-scale=1.0">
    <title>fullstackgyan</title>
    <style>
        #outer{
            width: 400px;
             height: 400px;
             background: blue;
        }
        #r1{
            width:400px ;
            height: 200px;
            background: green;
        }
        #r2{
            width: 400px;
            height: 200px;
            background: orange;
        }
    </style>
</head>
<body>
    <h1>This is the first level div in html</h1>
    <div id="outer">
        <div id="r1"></div>
        <div id="r2"></div>
    </div>
</body>
</html>

In this you can see that the id whose name is outer, in its css, the height has been taken as 200 px and 200 px, which is dividing according to the height, then there will be no change in the value of width.
see the code of css, how will divide
<style>
        #outer{
            width: 400px;
             height: 400px;
             background: blue;
        }
        #r1{
            width:400px ;
            height: 200px;
            background: green;
        }
        #r2{
            width: 400px;
            height: 200px;
            background: orange;
        }
    </style>
In this you can see that a new id #r1 and #r2 has been taken in which the value of height has been divided.
Now in you body tag the div was outer which is your entire box, you have to define it inside the same box, neither two div tag will be taken inside it whose id respectively r1 and r2 have been defined in css
which you can see below
<body>
    <h1>This is the first level div in html</h1>
    <div id="outer">
        <div id="r1"></div>
        <div id="r2"></div>
    </div>
</body>
Now we will do the final divide which will be done according to the width, for this we will see whether the partition to be done is upper or lower, but if we look at the above diagram, then we have to divide the lower box, then we are on id r2. can start work
For this we can take the name of any id and how many divisions have to be done, you can create that id but in our case we have to do only two partitions, then we create two ids c1 and c2 and we can divide by width. If you are dividing accordingly, then there will be 200px and 200px in one id.
Note: – Remember that if you divide according to the width,
it is very important to give float: left because if we do not give the division box will go up to you, so it is done to set it.
When there is division of width, we will definitely give float left.
We can see this below css code
<style>
        #outer{
            width: 400px;
             height: 400px;
             background: blue;
        }
        #r1{
            width:400px ;
            height: 200px;
            background: green;
        }
        #r2{
            width: 400px;
            height: 200px;
            background: orange;
        }
        #c1{
            width:200px;
            height: 200px;
            background: blue;
            float: left;
        }
        #c2{
            width: 200px;
            height: 200px;
            background: red;
            float: left;
        }
    </style>
And you can also see in body tag
<body>
    <h1>This is the first level div in html</h1>
    <div id="outer">
        <div id="r1"></div>
        <div id="r2">
            <div id="c1"></div>
            <div id="c2"></div>
        </div>
    </div>
</body>
In this you can see the div which is to be divided,
then inside that div you will create two more div
and it will be defined in it and the id of that div has been defined by you css.
<!DOCTYPE html>
<html lang="en">
<head>
    <meta charset="UTF-8">
    <meta name="viewport" content="width=device-width, initial-scale=1.0">
    <title>fullstackgyan</title>
    <style>
        #outer{
            width: 400px;
             height: 400px;
             background: blue;
        }
        #r1{
            width:400px ;
            height: 200px;
            background: green;
        }
        #r2{
            width: 400px;
            height: 200px;
            background: orange;
        }
        #c1{
            width:200px;
            height: 200px;
            background: blue;
            float: left;
        }
        #c2{
            width: 200px;
            height: 200px;
            background: red;
            float: left;
        }
    </style>
</head>
<body>
    <h1>This is the first level div in html</h1>
    <div id="outer">
        <div id="r1"></div>
        <div id="r2">
            <div id="c1"></div>
            <div id="c2"></div>
        </div>
    </div>
</body>
</html>

reference – https://javahindi.com/html-all-topics/
Request – If you found this post useful(HTML and CSS Div diagram) for you
(HTML and CSS Div diagram), then do not limit it to yourself(HTML and CSS Div diagram), do share it